How to Share Screen on Microsoft Teams
How to Share Screen on Microsoft Teams on Laptop PC or Desktop PC is what this article is all about. You’ll also get some tips on Microsoft Teams share screen not working; plus Microsoft Teams share screen give control.
How to Share Screen on Microsoft Teams
The following procedures describe how to share screen on Microsoft Teams on laptop PC or desktop PC.
With Microsoft Teams, you can show your desktop, a specific app, a whiteboard, or a presentation in a meeting.
The following steps assume you have already joined the meeting and you’re the presenter.
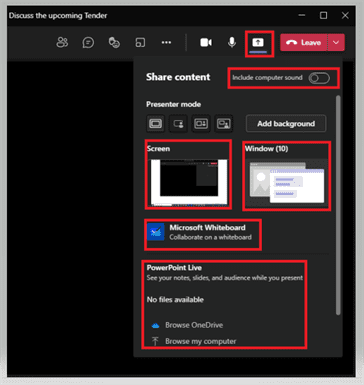
Step 1: Select Share content 
Step 2: Choose if you want to share your computer audio.
Step 3: Select what you want to share:
- Screen lets you show everything on your screen.
(Meeting participants see any notifications that might come in). - Window lets you share an open window like a specific app you have open.
(Meeting participants won’t see any notifications that might come in) - Microsoft Whiteboard and Freehand by Invision lets you share a whiteboard where participants can sketch together.
- PowerPoint Live lets you share a PowerPoint presentation.
Step 4: After you select what you want to show, a red border surrounds what you’re sharing.
Step 5: Select Stop sharing to stop showing your screen.
.
Share Screen on Microsoft Teams – Sharing Options explained
| Share your… | If you want to… | Great when… |
|---|---|---|
| Screen (Desktop) | Show your entire screen, including notifications and other desktop activity. | You need to seamlessly share multiple windows. |
| Window | Show just one window, and no notifications or other desktop activity. | You only need to show one thing and want to keep the rest of your screen to yourself. |
| PowerPoint | Present a PowerPoint file others can interact with. | You need to share a presentation and want others to be able to move through it at their own pace. For info on PowerPoint sharing, see Share PowerPoint slides in a Teams meeting. |
| Whiteboard | Collaborate with others in real time. | You want to sketch with others and have your notes attached to the meeting. |
How to share screen on Microsoft Teams with audio
Include computer sound
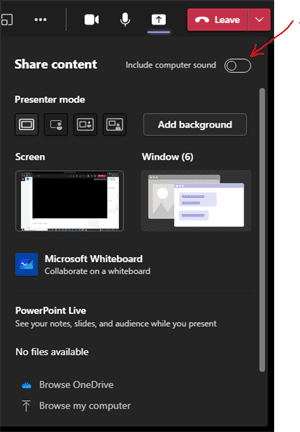
Sharing computer sound lets you stream audio from your computer to meeting participants, through Teams. You can use it to play a video or audio clip as part of your presentation.
To share sound, select Share content  from your meeting controls and then Include computer sound (as shown in the image on the left, it’s the switch on the top right of your sharing options). All sound from your computer, including notifications, will be audible in the meeting.
For more info, check out Share sound from your computer in a Teams meeting or live event.
Microsoft Teams share multiple screens
At present Microsoft Teams only shares content which is on the screen in focus. So, if you’ve multiple screens and you want to share your screens, there’s work around. You do it by sharing what’s on one screen first and then stop sharing from that screen and then start sharing again whatever is on the other screen.
This assumes you’re already in your meeting:
- Click the Share Icon on the meeting controls.
- Select what you want to share (Desktop Screen, Open App Window, Whiteboard or PowerPoint Live)
- After you finish sharing from this Physical Screen then stop sharing.
- If you want to share something that is open on a different screen, you start another screen sharing from the different screen.
Microsoft Teams share screen give control
Suppose you’re experiencing problems with certain applications on your PC, you could give control to a technician to help you resolve whatever issues you’re experiencing.
There could be other reasons you would want to give control to someone else.
Give and take control
Give control of shared content.
If you want another meeting participant to change a file, help you present, or demonstrate something, you can give control to that person. You will both be in control of the sharing, and you can take back control anytime.
Note: When you’re sharing an app, only give control to people you trust. People you give control to may send commands that could affect your system or other apps. Microsoft has taken steps to prevent this but they haven’t tested every possible system customization.
- On the sharing toolbar, select Give control.
- Select the name of the person you want to give control to. Teams sends a notification to that person to let them know you’re sharing control. While you’re sharing control, they can make selections, edits, and other modifications to the shared screen.
- To take control back, select Take back control.
Take control of shared content
To take control while another person is sharing, select Request control. The person sharing can then approve or deny your request.
While you have control, you can make selections, edits, and other modifications to the shared screen.
When you’re done, select Release control to stop sharing control.
Microsoft Teams share screen not working
Microsoft Teams share screen not working might be due to a number of reasons. For example:
- Screen sharing is disabled. (IT admin might have disabled this in your meeting policy)
- Poor Internet Connection. (Not enough bandwidth for screen share)
- If you join a Teams meeting on the Web, make sure you’re using the latest versions of either Microsoft Edge or Chrome browsers otherwise Screen sharing won’t work.
- Microsoft Teams cache could be corrupted resulting in screen share not working. Clear the Microsoft Teams cache as follows:
- Sign out of Teams App.
- Right-Click the Teams Icon in System Tray and select Quit.
- type ” %appdata%\Microsoft\Teams ” and press Enter.
- type ” Ctrl + A ” to select all files and folders
- Delete all the selected files.
- Reboot your PC.

- Check for Updates from within the Teams Desktop App
- At the Top Right of your Teams Window: Click the … (To the left of your user profile)
- Click ” Check for Updates “
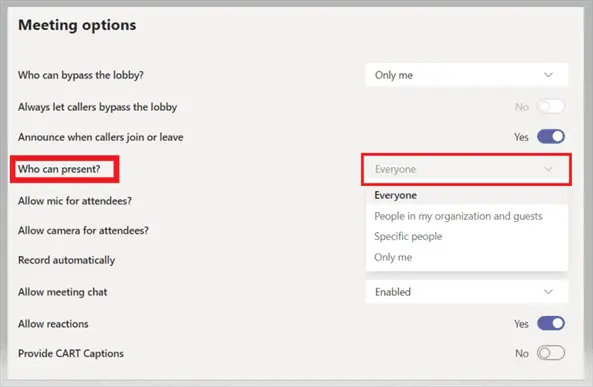
- Meeting Options could be setup to allow only the Presenter to present and therefore be able to Screen share during a Teams meeting. The meeting organizer sets these options.
How to stop sharing screen on Microsoft Teams shortcut
To stop sharing screen on Microsoft Teams using a shortcut use this: Ctrl + Shift + E.
and to start sharing screen on Microsoft Teams using a shortcut use this too: Ctrl + Shift + E.
You may notice it is the same key combination used, meaning it toggles between starting and stopping screen sharing on Teams.
| What you want to do | Teams shortcut |
|---|---|
| Start sharing screen on Microsoft Teams | Ctrl + Shift + E |
| Stop sharing screen on Microsoft Teams | Ctrl + Shift + E |
| Hide Share Options | Ctrl + Shift + E |
How to Share Screen on Microsoft Teams – benefits
Sharing your screen with other users, whether in your organization or external, has many benefits.
- Education and training – you can explain a concept as if you were in a class room.
- You can demonstrate a new product.
- You can see why something may not be working in real time and find a fix.
When you know how to share screen on Microsoft Teams, you have many options to communicate your message to many groups of people.
Related Posts: How to improve MS Teams performance on Windows PC?
