How to Upgrade to Windows 11 without TPM 2.0 (the Workaround)
Discover how to Upgrade to Windows 11 without TPM 2.0. Follow our simple guide to bypass TPM checks and upgrade your system.
Should you install Windows 11 on unsupported hardware? This article describes how to upgrade to Windows 11 without TPM 2.0.
You have determined that your PC does not meet some of the needed system requirements to upgrade from Windows 10 to Windows 11 successfully. Here is the way to do it.
Should I Upgrade to Windows 11 if hardware is unsupported?
Should you upgrade to Windows 11 if your PC hardware is not supported? The answer is it depends.
Windows 11 Official Release date was 5th October 2021 and some users’ PCs don’t meet the system requirements to upgrade.
Microsoft has provided a workaround to allow the upgrade from Windows 10 to Windows 11 for PCs that don’t meet the requirements, at the owners’ risk. Microsoft clearly stated this on their website found here.
Yes, Upgrade to Windows 11
If the PC that you wish to upgrade to Windows 11 is a spare device that’s not critical for your daily work then, yes you can proceed with upgrading to Windows 11 following the procedure described in this article. This gives you an opportunity to find out what’s good about Windows 11.
If you decide to edit the registry to allow Windows 11 to be successfully installed on unsupported hardware, there is a risk Microsoft can stop releasing updates down the line.
Also, another factor to consider is the security risk for your device if it’s used in a production environment. The security that is embedded in TPM 2.0 would be absent from your PC.
No, Don’t Upgrade to Windows 11
Windows 10 End of Support
Windows 10 is supported by Microsoft until 25th October 2025, so at the time of writing this article, it’s four (4) more years of receiving security updates from Microsoft.
If the PC you have is the only one that you have and it’s running important programs for you, then it’s probably best to stay using Windows 10.
PC Health Check Results
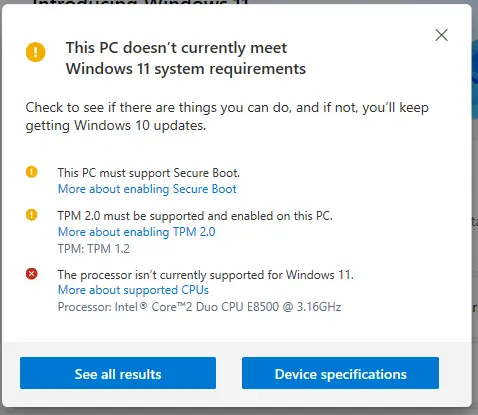
The PC results in the image above show that this PC fails critically to meet the Windows 11 system requirements on the CPU, Secure Boot support and TPM 2.0
Windows 11 TPM
What is TPM? TPM stands for Trusted Platform Module.
Most PCs that have been manufactured as from 2016 are capable of running Trusted Platform Module version 2.0 (TPM 2.0).
TPM 2.0 is required to run Windows 11, as an important building block for security-related features. TPM 2.0 is used in Windows 11 for a number of features, including Windows Hello for identity protection and BitLocker for data protection.
Why you shouldn’t Install Windows 11 without TPM 2.0
TPM and Secure Boot with Trusted Boot, block boot file modifications and will block bootkits and rootkits. TPM 1.2 supports Secure Boot, but it’s limited to RSA and SHA-1 hashing. TPM 2.0 supports newer algorithms and more crypto options. See TPM recommendations here.
How to Upgrade to Windows 11 without TPM 2.0
This step-by-step guide on how to upgrade to Windows 11 without TPM 2.0 applies to Windows 10 Desktop PCs and Windows 10 Laptop PCs. You end up with either a Windows 11 Laptop or Windows 11 Desktop.
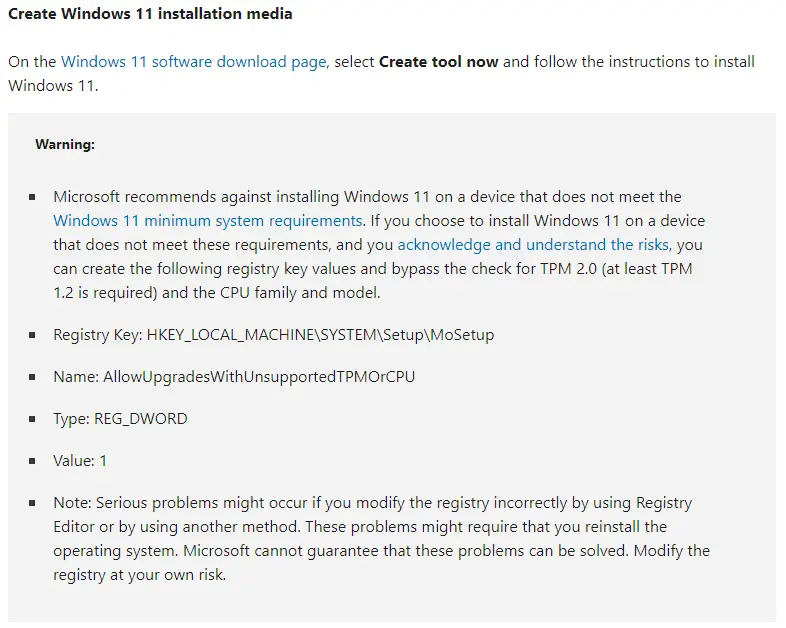
- Run “Check for Updates” to ensure your Windows 10 system is up to date.
- Download Windows 11 ISO image.
- Edit the Windows Registry to create the registry key values and bypass the check for TPM 2.0 (at least TPM 1.2 is required) and the CPU family and model
- Mount ISO Image and Run “Setup.exe” from the mounted ISO image Disk.
IF you’re editing the registry is a challenge for you, you can use Rufus Software, the process is described here in full Windows 11 bootable USB Rufus.
Step 1: How to Upgrade to Windows 11 without TPM 2.0 – Check for Windows Updates
- Type “Updates” in the Search Field on the Taskbar
- Click best match which should be “Check for Updates”
- Install all the available updates for your Windows 10 system
Step 2: How to Upgrade to Windows 11 without TPM 2.0 – Download Windows 11 ISO
To store the ISO, you need about 8GB to 10GB of free storage space on your hard drive or USB Drive. The ISO itself is under 6GB but the other space is for any supporting files that you may need.
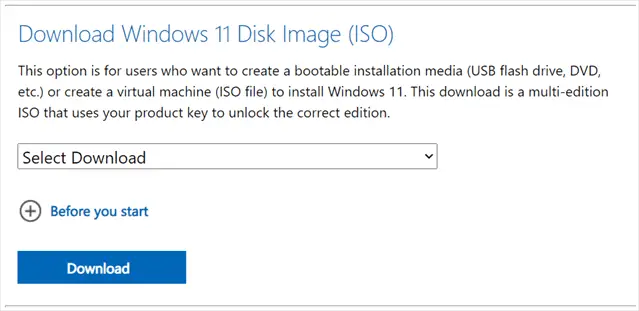
- Go to the Windows 11 Software Download webpage here – Download Windows 11 ISO
- Scroll down the page to Download Windows 11 Disk Image (ISO) and Select Download.
- Select Windows 11.
- When you click Download it asks to choose Language.
- Choose your language and then click “Confirm” to start the ISO download.
Step 3: How to Upgrade to Windows 11 without TPM 2.0 – Create the registry key values to bypass checks for TPM 2.0 and CPU
This step shows you how to bypass TPM 2.0 to install Windows 11.
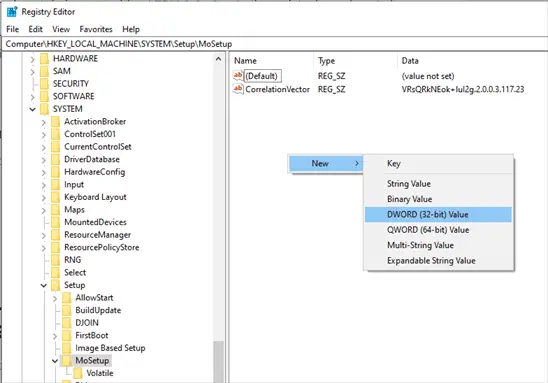
- Type “Registry Editor” in the Search Field on the Taskbar.
- Open best match which should be Registry Editor App and Run as Administrator.
- When Registry Editor Opens up type “HKEY_LOCAL_MACHINE\SYSTEM\Setup\MoSetup” and press ENTER.
- Right-Click anywhere blank in the column on the Right and select New
- Under Key select DWORD (32-bit) Value
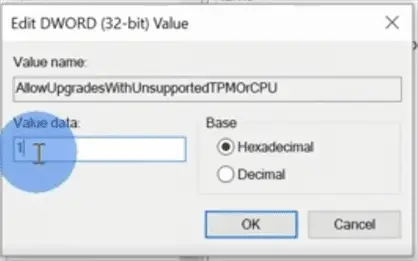
- Name the Value ” AllowUpgradesWithUnsupportedTPMOrCPU ” (without the quotes)
- Double Click the name value ” AllowUpgradesWithUnsupportedTPMOrCPU” to open it and type “1” in value data field as shown in picture below.
- Click OK
- Close Registry Editor because you’re done.
Step 4: How to Upgrade to Windows 11 without TPM 2.0 – Mount ISO Image and Run “Setup.exe”
There are two installation paths available:
- Upgrade by launching Setup on the media while running Windows 10. You will have the option to:
a. Perform a Full Upgrade, which keeps personal files (including drivers), apps, and Windows Settings. This is the default experience and is the one that Installation Assistant uses. This option is recommended in case you want to downgrade if you’re not happy with Windows 11. However, you only have a 10-day window to go back to Windows 10.
b. Keep Data Only will keep personal files (including drivers) only, not apps and not Windows Settings.
c. Clean Install will install Windows 11 and keep nothing from the Windows 10 installation. For more info, see Give your PC a Fresh Start. - Boot from media to launch Setup. This path is a clean install and will not retain previous files or settings. For more info, see Give your PC a Fresh Start.
Important Warning
If you’ve created a registry key to bypass checking for CPU family and Model and TPM 2.0, Your PC will not verify that your processor is on the approved CPU list based on family and model of processor.
You should verify that your device meets minimum system requirements before you choose to boot from media, because after you have done the registry modification, it will allow you to install Windows 11 if you have at least TPM 1.2 (instead of the minimum system requirement which requires TPM 2.0).
How to upgrade to Windows 11 without losing data
It’s always a good idea to back up your Data yourself rather than rely on the upgrade process to keep your data. You can never have too many backups.
Yes, if you Run Setup from a mounted Windows 11 ISO disk whilst running Windows 10, you have an option to Choose Full Upgrade. This option keeps personal files (including drivers), apps, and Windows Settings.
Windows 11 revert back to Windows 10
If for any reason you want to downgrade back to your familiar Windows 10, you can do so as long as it’s within the first 10 days of installing Windows 11.
After 10 days the Windows 10 Files are wiped so the only way to get back to Windows 10 would be to install Windows 10 afresh.
To revert back to Windows 10 within 10 days of the upgrade to Windows 11 do this.
Start menu > Settings > Windows Update > Advanced options > Recovery > Go Back
Following the process described in this article “How to Upgrade to Windows 11 without TPM 2.0” gives you a chance to test out Windows 11 features without having to spend loads of money to buy a new PC, yet.
Please Note: We do not recommend that you run Windows 11 on unsupported hardware. You do so at your own risk.
Related Posts:
You can use Rufus to create a bootable Windows 11 USB as described in this post: Windows 11 bootable USB Rufus. You have an option to create a bootable USB that’s already configured with no TPM or no secure boot.
