Microsoft Outlook Calendar Tips and Tricks
Microsoft Outlook Calendar Tips and Tricks. This article shows you various tips to increase your efficiency when working with Outlook calendar. You’re going to see how you can have both Outlook Email and Calendar open at the same time, reply with meeting, create appointment from email, view more than 1 calendar and many other tricks, please read on.
How to Have Outlook Email and Calendar Open at the Same Time
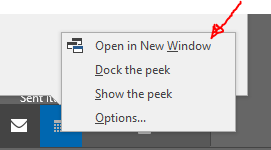
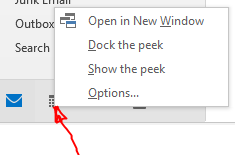
You can open up a new window for your Outlook Calendar, so you can look at your calendar alongside your email. When you open your Microsoft Outlook, it opens your mail by default. If you want to have both your mail and calendar open at the same time, you can. here is what to do:
- Go to the bottom left-hand side of your Outlook screen
- Highlight calendar icon and right-click
- Select “Open in New Window” option to open your calendar in a new Window.
- You have arrived at your destination!
If you have your calendar open, but you want to jump to your email, then you lose sight of your calendar.
Instead, you can leave your calendar open all the time as well. Right down at the bottom left-hand corner. You can right click on the calendar and there’s an option to open in a new window. Click on that to open up another instance of your calendar.
You could put this on a different monitor or you could put it over to one side of your screen. If you then jump over into your mail, you still have your calendar still open. You now have your mail and your calendar both open at the same time.
Reply with Meeting Outlook
You can reply to an email thread with a meeting and it’ll preserve all of the context from the email thread.

Here if you have an email message from a co-worker and probably it’s about a topic you don’t want to just email back and forth on. Instead, you can set up a meeting. Here is how to do it:
- Have the email message selected. right up on top in the home tab within the respond category.
- Click on the option to reply with a meeting.
Reply with Meeting Outlook shortcut
You could also press the reply with meeting outlook shortcut keys as follows:
- Have the email message you want to reply to, selected.
- Press “Ctrl, Alt and R”
- Next the New Meeting details appear giving you a chance to make changes.
- When a new email message opens up and you’ll see a few things here. The title is pulled from the title of the email thread.
- The sender of the email you are replying to is pulled in because they are a required attendee. If anyone was on the cc line, they’d be included as an optional attendee.
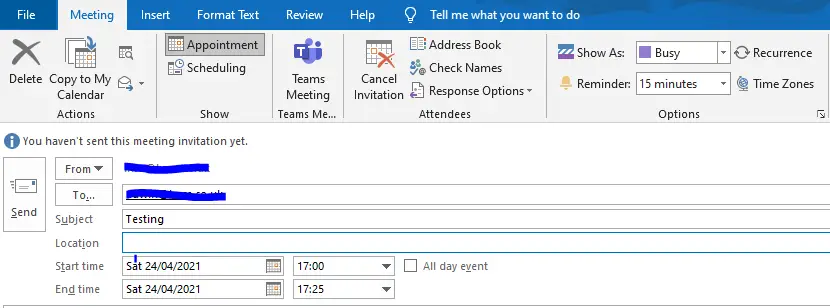
When you look down below, it automatically turns it into a Team’s Meeting and if you scroll down, it preserves all of the content of the message. This makes it a lot easier to set up a meeting, especially if you want to discuss the email thread.
Create Appointment from Email Outlook – Microsoft Outlook Calendar Tips and Tricks
This is similar to the previous tip, where you set up a meeting. (The difference being you’re not sending it out to anyone, you’re just using this to mark off time of your calendar.)
But instead with this tip you’re going to set up an appointment. You received an email from someone that keeps encouraging you to find time to check up on something they’re recommending.
You decide to set sometime aside to investigate for yourself whatever is being recommended and determine if it makes sense for you.
To set up an appointment you can click on the email message, and drag and drop it down to the calendar icon at the bottom left-hand side of your screen.
Once you hover over and then release. This opens up a new appointment and it pulls in the subject of the email. It also pulls in all of the context. All you need to do now is select a date and a time and your appointment is ready to go.

Easily Recreate Meeting in Outlook – Microsoft Outlook Calendar Tips and Tricks
You can very easily recreate a meeting on your calendar. Let’s say you set up a meeting with all the usual meeting requirements like Subject, Location, Time, Required Attendees, Optional Attendees and any documents to be read before the meeting.
Let’s say you allow an hour for the meeting and you send invitations out to your participants. After your meeting has taken place and you realize you need more time to discuss more.
And you want to make sure you set up a subsequent meeting. You have two options
- Now you could go in and set up a whole new meeting. Invite all the same people and provide all the same content.
- OR you could simply click on the meeting that you set up before, Press Control Key and then drag over to a new time slot. and now you have a new meeting although it’s not yet committed. You need to click into the meeting and send it to all of the meeting participants. After you’ve clicked into the meeting, and then click on Send to formalize the meeting.
You’ll find this is pretty easy.
How Do I Change the Time Slots in Outlook Calendar?
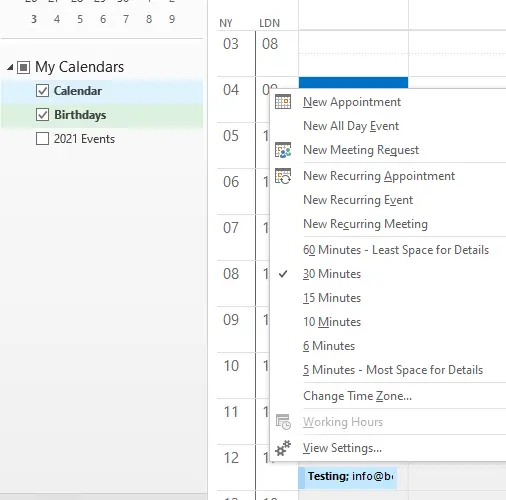
You can change the Time Slots that are shown within Outlook by default. When you look at the calendar, it shows 30-minute increments. But what if you want more granularity or maybe less granularity, you can go over to the left hand-side where you can see the time scale. You can right-click and change it to any one of the values there.
Suppose you want to set up 45-minute meeting sessions. You’ll change the scale to 15 minutes. Now you see a lot more details and you could highlight a 45-minute slot. If you want to change back, you simply right click, and then you can switch it back to the default of 30 minutes.
View More than One Calendar Plus Overlay in Outlook – Microsoft Outlook Calendar Tips and Tricks
You can view other calendars side by side with your own calendar and, along with that, you can even overlay these other calendars.
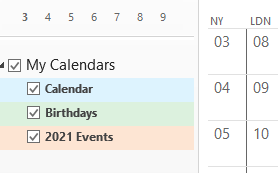
On top of your calendar, you can see your upcoming week in the schedule. And you’ve also created a company-wide calendar that includes this year’s events. On the left-hand side, you see the other calendars. To see them displayed you’ll click on them and they show to the right of your calendar.
You see calendars displayed side by side. If you want to see the calendar to your right overlaid on top of your calendar, you can simply Click on the left pointing arrow icon and then that calendar overlays on top of your calendar.

If you want to create an event on the Events calendar, you can simply select the Events calendar as the active calendar and now you can create an event.
But if you want to create an event on your own calendar, you can Click on your calendar to make it the active calendar and you can create an event there.
To remove the overlay, you can click on the right pointing arrow and this will push it, so it’s side by side again, and once you’re done looking at this calendar, you can click on the x up there.

Now you might be wondering well, how do you get other calendars in here, so you could see them side by side or so you could overlay them.
- You can add calendars using the Outlook Home Tab ribbon toolbars under Manage Calendars. You can add additional calendars by adding other people’s calendars from your organization. You could even find calendars on the internet, maybe your favourite sports team has a calendar or you can even create a new blank calendar and then you can share it with others.
- Another way of adding calendars is by right-clicking My Calendars on the left to get the options shown in the image here.
These actions give you a means to work together on a shared calendar.
How Do I Change the Color of an Event in Outlook Calendar?
Colour Categorize manually Meetings you don’t want to miss.
You can use colour to better visualize your calendar. All of your upcoming meetings and appointments are just in the default or the standard blue. Here, if you right click on the calendar, you can change the default colour, maybe you want to go with just a calming green.
If you have some meetings coming up that really need your attention. For example, If someone scheduled a meeting with you to talk about the New York Office issues. Before this meeting you need to make sure you think of some reasons why you’re having these different issues.
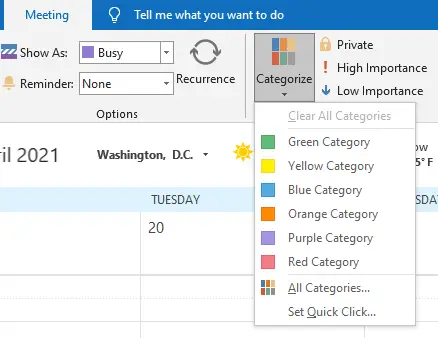
You could use categories to do this. To set up categories click on the meeting item, and this opens up the meeting ribbon up on top over there. You see different categories. You could go with one of these predefined categories or you could even set up your own category.
You’ll click on all categories to see all of the different categories. You could create your own or you could even rename some of them. You’ll just use one of these existing categories, say the yellow category.
One thing that’s really neat is over on the right-hand side you can also set a Shortcut Key to toggle this category On or Off. Select Ctrl + F2 and then click on ok. This takes you back to your calendar. Now with an appointment item selected, you can press Ctrl + F2 and that’ll toggle it yellow.
This way you definitely won’t miss that meeting coming up. You’ll have some time to prepare. If you press Ctrl + F2 again, that’ll toggle off the colour.
Say YES to a new life of Secure Remote Collaboration with your Employees and Customers?
How to Set Working Hours in Outlook – Microsoft Outlook Calendar Tips and Tricks
Outlook Work time settings
You can change your work hours in Outlook, if you look over on your calendar on the left-hand side, you’ll see that right here it’s, a greyish colour, but as soon as you hit 8am all the way through 5pm. It’s a little bit lighter. This indicates that these are your core working hours and once again past 5pm, it’s a little bit darker.
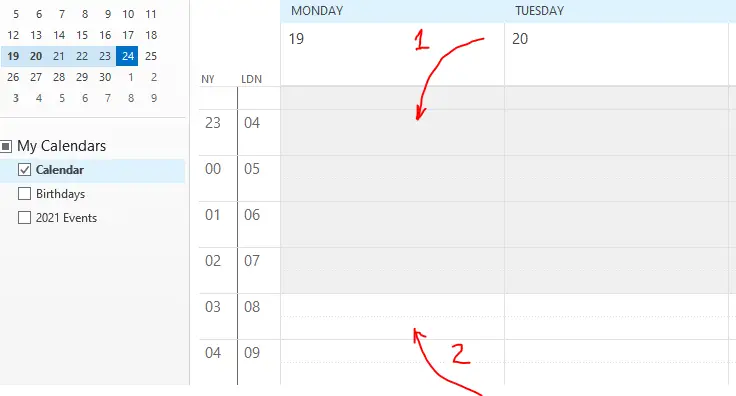
When someone goes to schedule a meeting with you, they’ll see your core working hours. If eight to five seems like a very long day and you wish to cut down on when people can schedule meetings with you. You’ll right click on your calendar and then go down to calendar options.
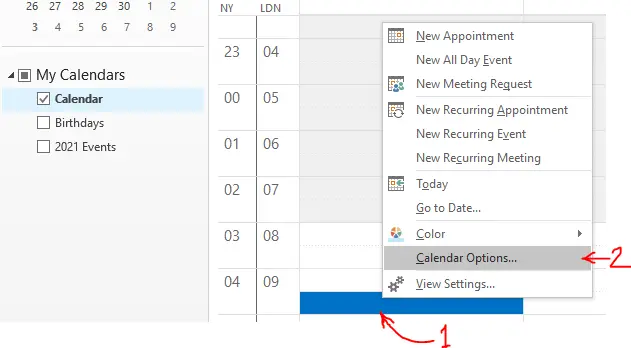
Within calendar options, you can adjust your work hours. If eight to five is really a long day, you can choose to adjust your core working hours. Like start at 09:00am till 15:00pm. When you’re done click OK to go back to your calendar.

Now you’ll see that your core hours now show up between 9am and 3pm. So hopefully this will influence when people schedule meetings with you and this will in turn lighten your meeting load. You’ll see what happens.
Show Multiple Time Zones Outlook Calendar – Microsoft Outlook Calendar Tips and Tricks
You can very easily show multiple time zones on your Outlook calendar. One of your employees at your company is based in New York, and they request that you meet at 10 am. on Friday.
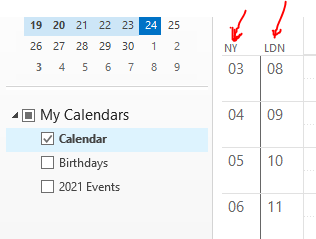
Now they’re thinking about their local time zone, so you have to do the math to convert it. Luckily, Outlook can help you with that here.
Once again, you’ll go over to the left hand-side. Where you see the time, you can right-click and there’s an option to change the time zone is appears. When you Click on this. This opens up calendar settings and here in the time zone section you can see that your default time zone is currently set to London UK, and here you can add up to three time zones total.
So you locate the New York time zone and click it to select it. (but you can choose whatever time zone you want). Next, you’ll click on ok. Now, on your calendar, you can see the New York time zones alongside London UK and it looks like 10am in New York 5am in London UK, so you could set up the meeting with correct times for either participant.
As an alternative, you can also go into a meeting invitation from the meeting organiser and set their time zone. So, if the person who sends you the invitation is based in New York, you set up that meetings’ time zone as New York because they want to meet at 10am (when it is 10am in New York). Check the box for time zones, and set it to the New York time zone.
When its 10am in New York, it’ll show up as 3pm on your calendar in London.
Outlook Calendar Tips and Tricks: using Natural language to set meeting time
You can use natural language to set the meeting start time in Outlook. Let’s say that you have a potential customer who wants to meet say in Five Weeks, you would have to click on the calendar icon, and here you have to count forward five weeks.
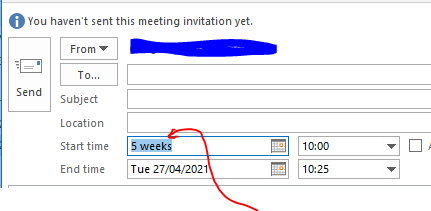
Was it the 25th or was it the 1st ?, You’ve lost track. So, you’d have to go back and count it again. Instead, you could let Outlook do the heavy lifting for you here. You’ll highlight the Start Date and simply type in: “in five weeks”. When you hit enter and Outlook determines what that date is for you.
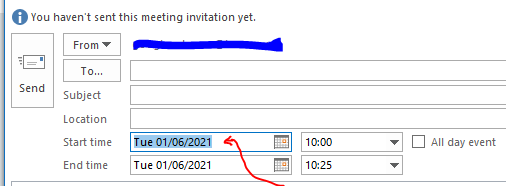
Maybe it’s not five weeks from today, but something like third Thursday in August and when you press Enter, the calculated date shows its indeed Thursday 19th August, 2021. It also confirms that August 19th is in fact the third Thursday in August, 2021.
You could also set different holidays. Let’s say you want to meet Christmas day? You just type in “Christmas” (without the quotes) and then press Enter.
Microsoft Outlook figures out that it’s December 25th, so it’s pretty smart in working out what some of the dates are.
A word of caution if you type in “Xmas”, Outlook returns an error because it doesn’t yet include all abbreviated words. Christmas is easy though because it always falls on the same date. You can use the calendar icon to confirm what day of the week Christmas falls for the year in question.
Give this a go and see how it works in practice.
Outlook Calendar Tips and Tricks: Date Navigator

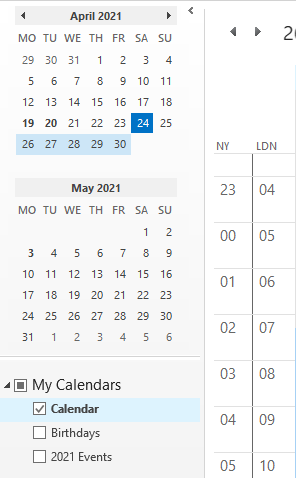
You can use the date navigator to view your calendar in whatever way you want to view it. If you’re on the Home Tab on Outlook Ribbon, you can see the few different predefined views under the “Arrange” category.
You can view just the individual day, the work week, the week, the month and there’s even a schedule view. But what if you want to see even more time on the views?
What if you just want to see some specific dates? Let’s first turn our attention to the date navigator over on the left-hand side. So, right now you could be viewing the month view, and where you see a complete month, in our picture, you can see a complete month of April and also a few dates of previous month and the coming month. If you want to see more months coming up, you can drag the cursor (showing up and down arrowheads) vertically downwards to reveal the three months shown.
You can even drag the cursor (showing left and right arrowheads) to the right horizontally and pull it out, to see half a year all in one view. With all these different views, especially the month view, it helps select the right date for your appointment.
What if you just want to see let’s say two weeks on your calendar, maybe this week and the upcoming week, you can go over to the left-hand side of the weeks, the cursor changes – and here you can highlight the weeks by clicking and dragging mouse cursor down to cover two weeks.
This will limit your view to two weeks or even here you could highlight three and then you could see three, so you could select what time period you want to see by dragging your mouse pointer.
Now let’s say you jump into the day view. Let’s say someone wants to schedule a meeting with you and they give you a few different options. Maybe they say: “I can meet on the 12th, the 15th or the 28th; will 3pm on any of those days work for you.?”
Typically, you’d probably click into the 12th and the 15th, and you then go through day by day trying to see which one works the best. Instead, you can view all of these dates at the same time. If you’ve selected the 12th already and then press the Control Key and click on the 15th, and then click on the 28th, and so now you see the times you’re free on those dates.
End Appointments and Meetings Early Outlook
You can set meetings to automatically start late or end early. When you look at your calendar here, you have a lot of meetings that just run up into the next meeting and there’s no buffer in between. There’s no time to go to the bathroom or grab a drink of water.
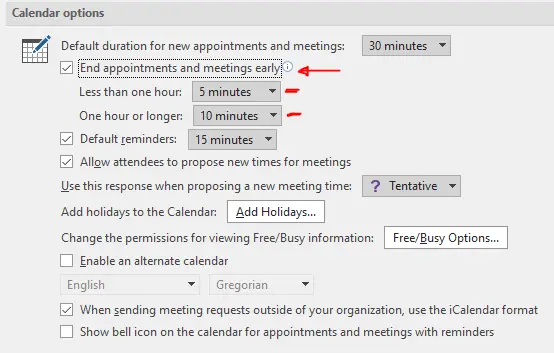
Luckily, you can change this using the settings. You’ll click on the calendar, right click and go down to calendar options. Within calendar options right near the top there you toggle this on. You can set a meeting to either start late or end early.
You can choose to end early for shorter meetings. If it’s less than an hour, you can set it to end five minutes early.
If the meeting’s longer let’s say an hour, you can have it end 10 minutes early. Select 10 minutes and then click on OK. Try to schedule an hour-long meeting now. Click on new meeting request here. Within the new meeting request, you’ll see that the end time is automatically truncated by 10 minutes, giving meeting participants a break between meetings to do whatever they need to.
Dark Mode Outlook
This last tip will show you how you can configure Dark Gray Mode for your Office theme. Apart from making it easy for your eyes it will also highlight or bring into focus your calendar appointment information.
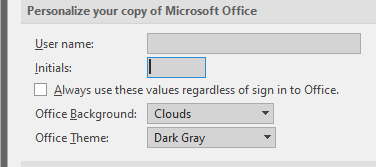
Here is how you do it:
Simply right-click on any of your calendar slots and select Calendar Options. Within calendar options, over on the left-hand side, click on General.
Locate Office Theme – open the drop down to select Office Theme of your choice. This will change the office theme across all of your different office Apps.
I like Dark Gray so I would select that and then press OK.
Notice the change in the look of your calendar. It’s little bit easier on your eyes.
Further Reading: Introduction to the Outlook Calendar
Related Post: Empowering Your Small Business with Remote Working UK US & Worldwide
