Upgrade to Windows 11 on unsupported hardware: (1 Easy Way)
Yes, you can Upgrade to Windows 11 on unsupported hardware, by editing the registry to bypass the Windows 11 setup checks or create a bootable USB media using Rufus that supports installing Windows 11 on unsupported hardware.
What is an Upgrade?
An upgrade differs from an update in that it moves your PC from a previous version of Windows—such as Windows 10—to Windows 11.
Microsoft
What is an Update?
An update ensures you have the most recent features and security improvements for your current version of Windows.
Microsoft
Upgrade to Windows 11 on unsupported hardware
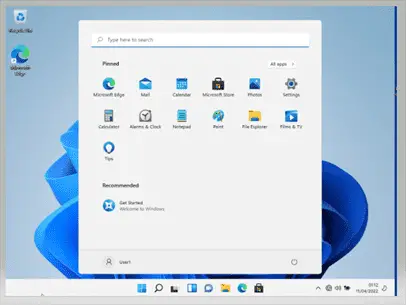
From Windows 10 you can upgrade to Windows 11 on unsupported hardware. This article gives you a comprehensive Step by Step guide to your Windows 10 to Windows 11 on unsupported hardware. This process uses a Windows 11 bootable USB media for unsupported hardware created using Rufus.
Total Time: 2 hours
Step 1: Check and install Windows 10 updates
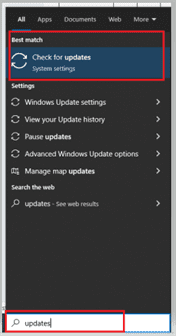
Type “updates” in the Search Bar, click and open best match “Check for Updates”.
Install any available Windows 10 updates.
Step 2: Run Windows 11 Setup
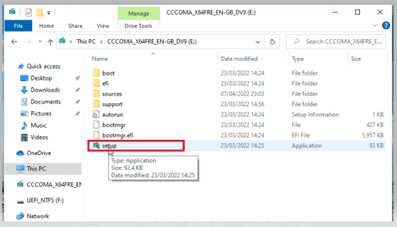
The process of creating a Rufus Windows 11 Bootable USB drive for unsupported Hardware is described in detail in this article. Rufus created Windows 11 Bootable USB disk drive.
Attach a Rufus created Windows 11 Bootable USB drive that has been customized to bypass TPM 2.0 and CPU checks (otherwise referred to as unsupported Hardware) and run setup.
Step 3: Allow Windows 11 Setup App to make changes to your PC
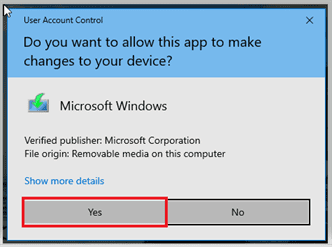
Running Setup – Allow App to make changes (User Account Control) to your PC.
Step 4: Choose either to download updates during setup or Not at the moment.
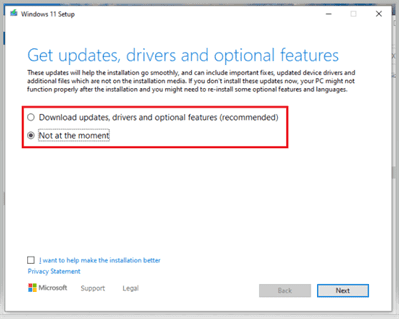
Windows 11 Setup – Get updates, drivers later if not connected to the internet yet.
(Also, if you’re not connected to the internet, it gives a chance to create local Windows Accounts to login into your PC without the Microsoft Account.)
Step 5: Enter your Windows 11 Product Key
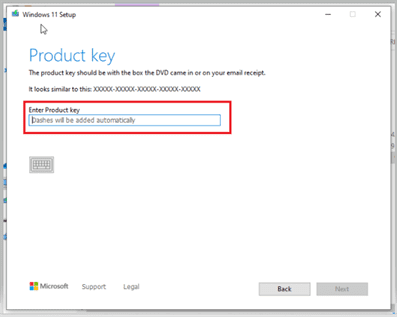
Windows 11 Setup – Enter Product Key – if setup hasn’t detected a product key yet, you enter your product key here.
Step 6: Choose Windows 11 image you want to install
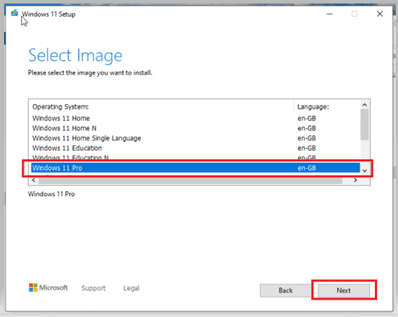
Windows 11 Setup – Choose Windows 11 Image you want to install. You can choose from the various editions of Windows 11 image (Home, Pro, Education etc)
Step 7: Accept License Terms
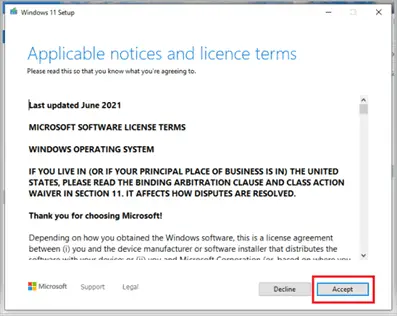
Windows 11 Setup – Agree to License Terms
Step 8: Choose what to keep from your Windows 10 PC
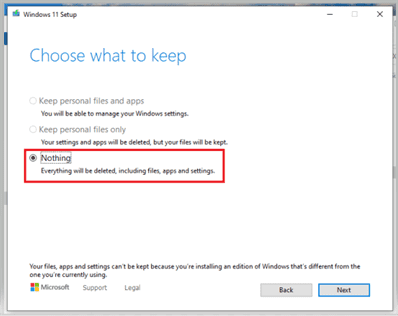
Windows 11 upgrade Setup, you can choose what to keep, either personal files and apps or keep just personal files only.
Step 9: Change what to keep from Windows 10
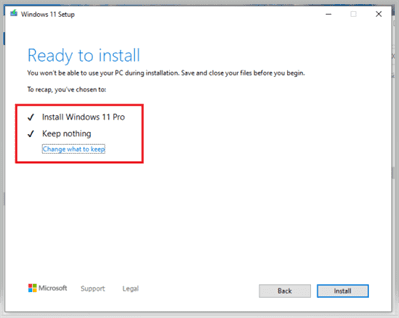
Windows 11 Setup gives a chance to change what to keep from your Windows 10 system before you install. (It is always recommended to do your own backup before you start the upgrade.)
Step 10: Installing Windows 11
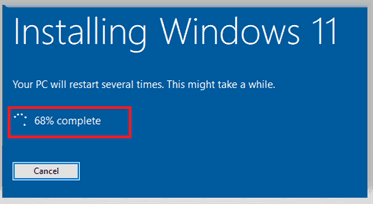
Installing Windows 11 at 68 %. Installing Windows 11 takes quite a bit of time. It depends on how fast your PC is but be prepared for it to take from 1 to 2 hours to complete.
Step 11: Select your Keyboard Layout
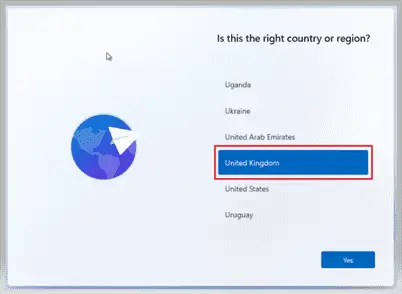
Installing Windows 11- Keyboard layout selection
Step 12: Connect to the internet or continue with limited setup
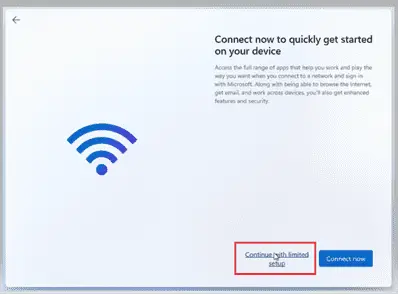
Installing Windows 11 – Connect to the internet or continue with limited setup.
If you continue with limited setup, it gives an opportunity to create local Windows accounts that you can use to login.
Step 13: Who’s going to use this device
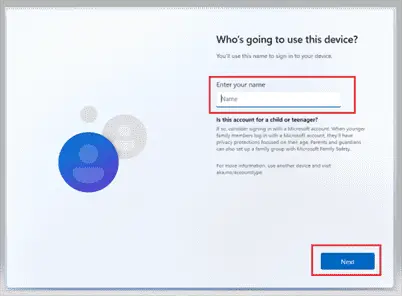
Installing Windows 11 – Who is going to use this device? Type the name of the user who’s going to use this PC and set their password as well.
You’ll be asked to choose which questions you will be asked and their answers in case you forget your password. This will allow you to reset your password if the situation arose where you can’t remember your password.
Step 14: Choose personal preferences
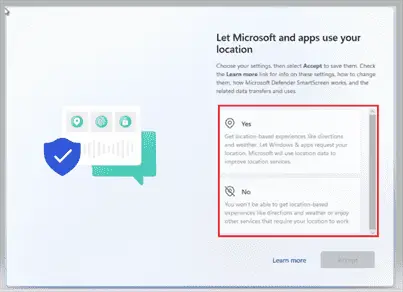
Choose personal preferences when installing Windows 11
* Let Microsoft and Apps use your Location.
* Find My Device.
* Send diagnostic data to Microsoft.
* Inking and Typing.
* Get tailored experiences with diagnostics data.
Step 15: Windows 11 is successfully installed

Windows 11 is successfully installed.
Tools:
- Internet Connection
- VirtualBox if you're using a Virtual Machine
- Windows 11 bootable USB media for unsupported hardware created using Rufus
Upgrade to Windows 11 on unsupported hardware with ISO file
Upgrade to Windows 11 on unsupported hardware with ISO file by following these steps.
- Run “Check for Windows updates” and install all the available updates.
- Download Windows image ISO from Microsoft here.
- Edit your Computer Registry – “HKEY_LOCAL_MACHINE\SYSTEM\Setup\MoSetup”
- Be careful when editing registry – Export your current settings before editing in case you need to get back where you were before you started.
- Mount the ISO image in order to be able to run “Setup” from the newly mounted drive.
- From this point on follow, the process as described in Upgrade to Windows 11 on unsupported hardware Step 2 above.
This process enables you to Upgrade Windows 10 to 11 on unsupported hardware.
How to Upgrade to Windows 11 on unsupported hardware without data loss
It’s always advisable to manually take backups of your data even if you’re going to use the built-in data saving of the Windows 11 setup app. You can’t have too many backups.
The procedure described in Upgrade to Windows 11 on unsupported hardware gives a step-by-step easy guide. In Step 8 you can choose what to keep from your Windows 10 PC to Windows 11.
Install Windows 11 on unsupported hardware
Install Windows 11 on unsupported hardware
Upgrade to Windows 11 on unsupported hardware FAQs
Further Reading: Installing Windows 11 on devices that don’t meet minimum system requirements
Related Posts: How to Upgrade to Windows 11 without TPM 2.0


